Sunday, November 25, 2012

Make Ribbon Fabric for Christmas Gifts and Decorations

Christmas Crafts You Can Make  -- Instructions for Ribbon Weaving and Fabric

ribbon woven on bonding fiber in diagonal design
Weave the ribbons from center to edges

Thanksgiving is over and it's time to get your Christmas crafts for display or gifts. If you have rolls of inexpensive ribbon you've accumulated from sales, thrift purchases or auctions, you may be surprised that this is the year you can use them for crafts projects. They don't just wrap the gift, they are the gift.

You can make a pillow or tree ornaments or even a purse. Here's how to make the ribbon fabric to make gifts of your choice. 

You'll need: 

Foamcore or smooth cardboard a little larger than the item you want to make.
Heat n Bond or similar bonding material large enough to fit the foam core or cardboard
Ribbon in different colors that will withstand a little heat
Straight pins, iron, ruler and scissors
Matching fabric for pillow back, purse or ornament 

Make a Board to Work On 

Cut the foamcore (like poster paper with foam center) or cardboard to a square size you can use for your project. If you want to make a large item such as a pillow, a 20 by 20 inch square will do, but if you want to make a Christmas ornament, a 10 by 10 inch square is a good size to start. 

Cover the Board 

Cover the board with Heat n Bond, Stitch Witchery or Wunder Under -- any kind of bonding fabric that will attach to the ribbon with heat. A large board will require more than one piece of bonding material. Attach the bonding with clear tape at the back of the board. Make it secure, but don't let it wrinkle. Match two pieces with no overlap, just butting the bonding together. Don't tape on the front -- just on the back. 

Mark Measurements on Sides 

Use a ruler to mark all sides of the covered board at 1-inch intervals. These are your guidelines for your design.  

Select Your Design and Get Started 

Choose how you want to make the design -- you can do a diagonal or a square. Either one will work with the 1-inch marks.

Cut ribbon in lengths at least 2 inches longer than your board.

Start in the middle and place a few ribbons horizontally or diagonally across the board, using the measurements as a guide and securing it with a straight pin on each side. I pushed the pins from the side to the back so they wouldn't be in the way on the front, but work with your board to see what works for you. 

Weave the Ribbon 

Weave a few ribbons vertically or diagonally through the horizontal or diagonal ones, not overlapping and not leaving any gaps. If you're working with a white bonding fabric and white ribbon, watch for spaces at the corners of the crossing ribbon.

Continue weaving over and under until you get a piece of ribbon fabric the size you need to make your item. As small as 12 inches by 12 inches will make a pillow, but you can use smaller pieces of ribbon fabric for Christmas ornaments or the front of a purse for a Christmas gift. 
different sizes and types of ribbon woven on board
Use different sizes of ribbons for interest

Iron the Bonding to the Ribbon 

Once you have the ribbon woven on the bonding fabric and secured, you're ready to make the fabric. Follow the instructions on the bonding material -- it probably recommends a dry iron and medium temperature for 5 to 7 seconds of pressing. Allow the fabric to cool.

Remove the bonding fabric from the board by removing the pins and releasing the tape on the back.

Cut Your Shapes 

Cut the shape you need for your project. I made a diagonal design that would make diamond shapes for tree ornaments, a pillow or purse front. 
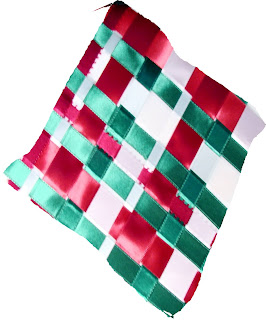
diamond shape cut from woven ribbon fabric ready for crafts
Ribbon fabric ready to make a Christmas ornament

Peel the Paper Off 

Peel the paper backing off the bonding fiber so you have a flexible ribbon fabric. Stitch around the shape to keep all the ribbons in place. 

Use the Fabric 

Use the ribbon fabric just as you would any other fabric, but reinforce it with a backing or lining for years of use. To make a diamond ornament like this, cut a backing fabric the size of your diamond. Place right sides together and stitch around the ornament, leaving an opening at the top to turn it and to add a hanger. Turn it right side out and close the opening with hand stitches or with the sewing machine, adding a ribbon loop for hanging.

This doesn't take much time (or thought) and the ribbon fabric is easy to work with once it's made.

Have a great holiday season!

Linda
cajunC

Saturday, October 13, 2012

Sewing Machine Repairs You Can Do DIY

A sewing machine usually has a 25-year warranty on the head, but that doesn't cover everything that can go wrong. A sewing machine is relatively simple (if it's not a new electronic one) and you can probably repair and do the maintenance work yourself. We purchased our Kenmore sewing machine in 1974 for $200 new. It's on its second 25 years now, out of warranty and relying on our ability to keep it operating.

If all that's standing between you and sewing is that your machine doesn't work, it's time to take a look at it. You can troubleshoot your sewing machine and repair almost anything that keeps it from sewing. If your stitches are less than stellar because the sewing machine doesn't cooperate, check the basics:  bobbin, needle, thread and tension.
Here's how to make repairs and keep your sewing machine operating.

Start by unplugging your sewing machine. 

Bobbin
Your bobbin is either horizontal or vertical, and it is located under the feed dogs where the needle goes down. Remove the plate that covers the bobbin, remove the bobbin and clean everything in the bobbin area with a dry toothbrush. You need to remove all lint, fuzz and threads from the bobbin area and under the feed dogs. It doesn't take much lint to mess with the stitching and it's probably the most common problem with most sewing machines. You don't want to pay someone to clean this when you can do it yourself.

If your bobbin is uneven, too full or not filled with similar thread as the top thread, you may have loose threads and skipped stitches. Use a bobbin wound evenly with the same thread as the top. Also, cut the starting thread close so it doesn't hang out of the side hole. Assemble the bobbin by the instructions in your manual. You probably need to pull the thread through a slide that is the bobbin tension and listen for it to click into place. Once you have it right, you'll open the lever on the bobbin cover to insert it into place. This keeps the bobbin from falling out of the cover while you're working.

When you wind a bobbin, you loosen the little wheel on the big wheel. Don't forget to tighten the little wheel again. This common error may make you think your machine is broken. This repair takes the repairman ten seconds and costs you a minimum repair fee. 

Needle
Use the thumb screw to remove the needle. Check to see how it's installed -- the flat side usually faces the thumb screw, but check so you'll get it right. Change to a new needle. If your needle has a burr or is even slightly bent, your sewing machine will notice before you do. Don't trust your eyes on this -- just do it. It might save you repair expense. 

Thread
Use the manual to thread the sewing machine if you're having a problem. It may show you something you're doing wrong, a skipped guide or even threading the needle from the wrong side. The general idea is to place the thread on the spool holder and run the thread from behind to the first guide. You loop down around the tension guide and back up to the guide that moves up and down when you sew. Thread the guides down the side of the machine to the needle and thread the needle. Most of these machines call for threading the needle from the left or from front to back. Once you have a bobbin in the machine and thread from spool holder through the needle, you can turn the machine on to check the tension. 

Tension
If the sewing machine tension isn't correct, you'll have loops on one side of the fabric, skips in the stitches, or a thread that runs on the top or bottom of the fabric that pulls out easily. The sewing machine tension is regulated by a dial on the front of most machines, and experimentation is the best way to determine the correct adjustment.

The bobbin also has a tension adjustment that is a little screw on the cover. If you can't get the tension correct by adjusting the dial on the front, open the sole plate and remove the bobbin in the cover. Use a tiny screwdriver -- you probably got one with the sewing machine -- or a paperclip to loosen the tension. Remember lefty loosey and righty tighty when adjusting the tension screw.

Place a piece of fabric under the needle, close the presser foot and sew a few stitches.  Remove the fabric and check the stitching on each side. Pull on the fabric and see whether the top thread or the bottom thread breaks first. If neither breaks, you've got the tension right. 

General Issues

Oil
If your sewing machine sounds like rocks in a tin can, it probably needs oil. Unplug it and oil with sewing machine oil ONLY using the manual to locate the oil ports. Plug it back in and use some old fabric to test it and remove any oil drips. 

Manual
You no longer have a manual for your sewing machine? You can get all the information you need online. Check the brand website first, then look for helpful sites that have the scanned manuals available. I've never seen one I couldn't locate for free. A recent search for a newer Singer Simple directed me to WalMart and an excellent video for threading this new sewing machine. 

Feed Dogs
The feed dogs move the fabric through the needle path. If the feed dogs are lowered, your sewing machine won't move the fabric. Quilters and crafters lower the feed dogs to freestyle stitch, but if your sewing machine won't move the fabric, you need to check the owner's manual to see where the button or knob is to raise the feed dogs. It's usually on the base of the machine on the right side. 

Presser Foot
You probably have different presser feet attachments with your machine. You need a presser foot that has a horizontal opening if you use a zigzag stitch. A presser foot that has only a small hole works great for straight stitching with a straight needle, but if you change stitches often, it's a great opportunity for you to break a needle. Use a zigzag presser foot and avoid the danger. The tip of a broken needle may get under the feed dogs and waste your sewing time while you try to figure out why your machine won't work.

If you've been through all these procedures, your sewing machine should spin like a top. If it doesn't, review the manual or ask a friend who sews. Take your machine to a repairman as a last resort. We're always into saving money. We have published the Retirement Living Guide Tips and Recipes for Easy Cooking on Smashwords. You can read a large sample for free: http://www.smashwords.com/books/view/125177 

Get ready to make Halloween costumes and Christmas gifts now that the weather is changing and you'll be indoors.

Linda
cajunC 

HHGWPD4NM8N4
WPA73FW9BVAA

Thursday, October 4, 2012

Easy Halloween Costumes for Any Age

Easy Halloween Costumes for Any Age Create Your Own
Costumes don't take much sewing or time and you can make something original with little effort.
Fruits and vegetables are easy costumes to make for children. Choose a fabric the color of the fruit or vegetable you want to represent. You'll need fabric the width of the child from elbow to elbow when elbows are extended. It needs to be twice the length from neckline to knees, or longer if you want to make a cucumber or a zucchini squash.
fruit vegetable halloween costume DIY
Fold Fabric in Half with Fold at the Bottom

Fold the fabric in half, wrong side out and stitch the sides, leaving room for arms starting about 5 inches down from the top. Stitch around the top by folding down 1/2 inch, then 2 inches. Stitch close to the edge and leave about 1 1/2 inches unstitched so you can run a string through the casing you've created. Stitch again about 1 inch from the top to create a ruffle. Run a heavy cord or ribbon through the casing by using a large safety pin or a bodkin to gather at the neckline when you're ready to try the Halloween costume for size.

Cut two holes out of the bottom fold for legs. Stitch around the leg holes and armholes if you want to keep it from fraying. 
Make a "bag" to wear for costume
Sew Sides, Fold Top and Stitch Two Rows for Casing
Turn the costume right side out and try it on your child. Have her step into the sack. Stuff it with newspapers or similar stuffing to create an apple, a tomato, an orange or whatever fruit or vegetable you want. Pull the gathers around the neck and see if you need to make adjustments.

Make a matching hat for your fruit or vegetable costume with a grocery bag large enough to fit on the child's head or a piece of fabric. You can make it square or like a beanie. Add two leaves for an apple, the pointy little "leaves" at the top of the tomato, or a "navel" for the orange. Your child could also be an eggplant or a cucumber with a little skinnying to the costume. Have a great Halloween experience, enjoy the kids and stay safe.  Linda cajunC

 WPA73FW9BVAA


Make a hat to complete the costume
Add a Paper or Fabric Hat for the Costume


Sunday, August 19, 2012

Create Cross-Stitch Alphabets With Silk Ribbon Embroidery Embellishments


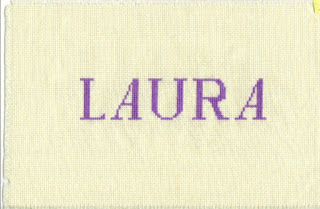
correcting cross stitch alphabets
Alphabet Letters Sometimes Look Like Spacing Is Incorrect
The smooth look and simplicity of counted cross-stitch work on the fabric is part of the appeal, but cross-stitch can be too plain, particularly with alphabets. That's when you need a fancy cross-stitch alphabet or maybe need to try something different.

With some alphabets, when you put letters together counting spaces between them, they just don't look right. That's because the eye is drawn to the mixture of diagonals with vertical lines. The diagonal "A" in the alphabet I'm using here makes it look as if the distance between the letters isn't the same. It is.

You can mix cross-stitch with ribbon embroidery to improve the look of a plain cross-stitch name. You may also be able to overcome an error you've made if you've miscounted. Instead of taking your work out and starting over, try something that may even improve the look.
add ribbon embroidery stitches to cross stitch alphabets
Silk Ribbon Embroidery Adds Color and Interest

Here's one I've been playing with in an attempt to see how silk embroidery works on Aida cloth. It's pretty easy to do, and with a little more work, this might be usable.

We have some cross-stitch alphabet books for sale if you want to try your luck at this. You might find an alphabet with flowers that you can change from cross-stitch to silk ribbon embroidery stitches. I'm always experimenting with needlework crafts to create one-of-a-kind items. Mixing cross-stitch with silk ribbon embroidery seems as if it could be interesting.

See you soon!

Linda
cajunC

Monday, July 23, 2012

Using Border Prints for Quilts and Pillows


Using Border Prints for Quilts and Pillows

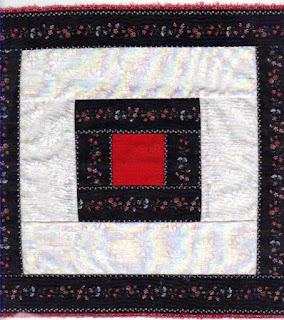
border prints make interesting quilt blocks
Use Border Prints for Interesting Quilt Blocks


Some fabrics have strips of design elements throughout the fabric and some have the strip at one or both ends. These fabrics make beautiful skirts, and Daisy Kingdom cornered the market on little girls’ dress fabrics several years ago. If you have any border prints, consider using them for quilting or for making pillows. 


Check the print by tearing it along the edge of a border design. You want to see if the printing is straight on the fabric. Surprisingly, most border prints are accurate. That’s not true for all printed fabrics, and it’s important for quilting or piecing that the fabric is printed straight with the fabric threads to avoid visible errors.

Border prints make strips for quilting projects
Tear Border Strips to Make Certain They are Printed Straight


Select contrasting fabrics, and plan a design or find a pattern you like. You’ll need a design that uses strips of fabric, not circles or wedges. Log cabin style designs are ideal, and you can make your own design by starting with a center square in the size you want to work with. I use at least 2 1/2 inches for center squares, and that makes a 2 inch finished center. If your border print is 2 1/2 inches, it will look like you did some careful planning. Make some fabric strips to start -- a light color if your border print is dark or a dark color if your border print is light. It doesn’t have to be a solid color -- try small prints or monochromatic designs. 

Add the Border Print Around the Edge
Start with a Center Square and Add a Square on Each Side


Add a block on each side of the center block. It will be the same size as the center. Using one of your long strips of fabric, add a strip on each side of the three blocks and cut off at the end so it’s even with the 3-block square. Your design will now be a center square with a square around it. It’s time to try your border print that you’ve cut into a strip. Add that strip next and cut at the end or let it extend beyond the edge by the size of the border. In other words, if your border print is 2 1/2 inches wide, leave 2 1/2 inches on one end before you start to sew the strip to the block. You can make two long sides and two short ones or you can make all four sides the same. Border prints seem to do better with two short sides and two long ones. Add another strip beyond the border print if you want large quilt blocks for a pillow or a quilt. 

Using border prints adds interest to the quilt block
Use the Border Print Twice to Make a Large Block


 Needlework: HHGWPD4NM8N4 Technorati

Thursday, June 21, 2012

Improving Applique Techniques -- Thin Fabrics, Blind Stitch, Whip Stitch and Machine Stitch

Improving Applique Techniques -- You Can Create Quality Quilting or Crafts Applique


Appliqué pillows, quilt blocks or craft pieces available for purchase at crafts fairs and thrift stores are sometimes inferior quality. The crafter has done a nice job, but has used fabrics or techniques that make the work look less than professional. Here’s a blue background with white flower petals and a yellow center. The crafter has spent hours on the handwork, but it has several “issues” that you’ll want to avoid. 

Appliqué of a flower on blue background. White petals show through yellow center.
Thin Fabric Affects the Appearance

Fabric Too Thin


When you’re choosing fabrics to appliqué, pick heavy cottons or fabrics that won’t show the background through. If the crafter had used the blue for petals on a white background, the design would be more attractive. The white wouldn’t show through the blue petals the same way the blue background shows through the white petals. Then, there’s the center. The yellow fabric is polyester and cotton, too thin for the appliqué. As a result, the white petal parts show through the yellow center. 

REMEDY: You can speed up your appliqué process and keep the background from showing through by using double layers of fabric for the petals. Cut two of each and match fabric front to fabric front. Stitch around the petal, leaving an opening for turning. The easy way to stitch this is with the sewing machine. Turn the petal and press around the edge. Attach the doubled fabric petal in place and whip stitch, blind stitch or machine stitch in place. You don’t have to turn edges as you go, you have a double layer of fabric and your finished product looks professional.

Double applique technique with lace edge used for pocket here
Double Fabric Applique with Lace Edge
Double applique with lace edge easy to make and attach
Sew Applique Right Sides Together and Turn
Another “fix” for the yellow center that shows background fabric through like this is to use batting to “stuff” it like you would for a biscuit quilt. Open one edge and use a knitting needle to push the batting into the center. Once you make a puffy center, you’ve covered the background fabric as well as made your appliqué look 3-dimensional.

Use Blind Stitch for Whip Stitch


Whipstitch is an acceptable stitch for appliqué, but the blind stitch is more attractive. 

applique techniques blind stitch for attaching applique
Blind Stitch Doesn't Show Like Whipstitch
REMEDY: If you aren’t familiar with the blind stitch, you can learn it in a jiffy and use it for your next appliqué. With an appliqué placed on the background fabric, start the blind stitch by pulling the threaded needle through the appliqué edge at the fold. Take a tiny stitch to anchor the thread, and another tiny stitch to catch the back fabric. Bring the needle through the back fabric and slide it through the folded edge of the appliqué for about 1/4 inch. Catch the background fabric again and bring the needle forward to the appliqué, slide it through the folded edge, and you’re making fast tracks with the blind stitch.

Alternative Stitches


sewing machine zigzag stitch for applique
Machine ZigZag Works for Applique, Too
If you want to machine stitch your appliqué, you can work with a small zigzag stitch. This Dresden plate block shows how easy it is to use the sewing machine to finish the edge of the appliqué. This one doesn’t have the edge turned under before zigzagging. It lies flat and is easy to sew, but after many washings, the fabric will fray along the edge. If you want to make your appliqué last, double fabric and turn as discussed or turn all raw edges under before stitching.

Quilting and Applique


You don’t have to be a perfectionist to have fun crafting, but you’ll want to avoid major goofs. Polyester and cotton fabrics are often too thin for appliqué or other quilting projects because the seams show through. One-hundred percent cotton has been the choice of quilters for years because it looks best and it’s easier to quilt. That brings us to another way you can improve your quilting and appliqué. Don’t use polyester and cotton sheeting fabric for anything to do with your crafts. It’s very difficult to quilt or hand-sew sheeting fabric I learned in high school. I took two sheets and made a coverlet for a 4-H project, with a diamond design overall. It was some of the most difficult handwork I’ve ever done. It wasn’t worth it, even for a blue ribbon -- but once I had it started, I couldn’t start over. Learn from my mistakes.

See you soon!
Linda

Saturday, May 12, 2012

Recycling with Needlework Crafts from Flea Markets, Thrift Stores and Garage Sales

  
Flea market and thrift store finds recycle into crafts
Skirt from Peru has applique and embroidery.
You've seen the cost of sewing thread, lace and all things wonderful for sewing and crafting at the fabric store. Whether you can afford these sewing notions isn't the question. They add to the cost of sewing and needleworking as a hobby, and take away some of the thrill of the bargain. You can find wonderful fabrics and embellishments for your crafts projects at the thrift store. Use your creativity to recycle them into something splendid. 

Go Thrifting

Many thrift shops are operated by non-profit organizations to help those who need. Some of the thrift stores in Texas help hospice-care patients and others are operated by church groups to provide food or financial assistance to families. Whatever the purpose, some of these are ideal crafter's hideaways. 

Small Fabrics

Scarf prints and fabrics are fashionable this summer, "Good Housekeeping" reports in the June 2012 issue. The thrift store usually has a bin of scarves or they may even have them hanging on a rack. You're interested in scarves you can use for crafts and sewing projects. Most scarves have a tiny tag near a corner that identifies the country of origin and the fabric. Skip the polyester and fine silk scarves unless you have a special project for them. Look for the heavier fabrics such as rayon or cotton. Rayon scarves may feel rough, almost like a fine wool and are often 36 inches square. Cotton scarves have a bandanna look and weight. These are scarves you can use for crafts, quilts or fancy pillows. Colorful hankies are another small fabric item you'll want to check at the thrift store.

Large Fabrics

Some thrift stores have donated fabric and crafts and sometimes thread, but you'll want to check out large fabrics. The bedding section has bedspreads and comforters. Don't look at them as bedspreads, but envision them as fabric for your crafts. You don't even have to rip the seams -- just cut within half an inch of the seam to get a large flat piece of fabric for crafting.

Check out the embellishments. Eyelet is expensive at the fabric store, but you may find a comforter or even a sheet with eyelet around the edge -- more eyelet than you'll need for most crafts projects.

Look at the clothing. You don't care about the size -- you're looking for lace, artistic designs and pieces you can use for crafts. Machine embroidery around the bottom of a skirt or dress makes a border print for crafting.

Check the artwork. Framed needlework crafts are usually in with the framed art and you may find something you can recycle. Old embroidery, cross-stitch and blackwork can be washed and made into a pillow or added to your next decorated shirt or skirt.

The picture at the top is applique from Peru and is part of a denim skirt found at...you guessed it -- the thrift store.  

Using Your Finds 

Embroidered pieces with damage on the outer edges can be cut out as appliques. Just leave half an inch or so around the edge of the design area. Stitch around the edge with the sewing machine where you want to fold it back for the applique and fold to the wrong side of the fabric on the stitching line. You can applique the piece in place by machine or by hand with tiny stitches.

Scarves make beautiful pillows. If you find a scarf that is smaller than you want for a pillow, cut matching fabric the size you want and sew the scarf in the center. If the scarf is larger than you want, you can cut the center for a pillow or cut mitered corners to use the border. A mitered corner has a 45-degree angle, or half of a right angle. It should look like this when you're done:

Recycle scarves from flea markets or thrift stores into pillows.
Make a Pillow from a Scarf

You'll want to mark the scarf into triangles. If you want a 12-inch pillow, you'll need a 28-inch scarf or larger. Measure 14 inches from the corner along the edge each way and mark a dot.  Strike a line joining the two dots to form a triangle. Measure from another corner and mark the dots and strike the line. Cut the two triangles off the corners of the scarf and stitch them together with a narrow seam for your pillow top. Fold the opposite corners right-side to right-side and make a "faux" seam diagonally to create the "X" down the center. Measure your piece and trim to 13 inches. You'll have an inch extra for stitching the back to the front, so you'll need to use 1/2 inch seam allowances all around the edge.

Make a pillow from a flea market scarf crafts project.
Mark Your Fabric into Triangles


Here's what you can do with a single large scarf -- either use the center for a pillow or use the corners. You may get two pillows from one large scarf, or possibly even three -- one from the middle and two from the corners. Have a great time crafting with recycled lace, embroidery, scarves and fabrics.

See you again SOON!  I was babysitting a few days while my daughter planted the garden, but managed to make some rounds to the thrift stores while in Arkansas.

Linda

Thursday, March 22, 2012

Sewing Home Accent Pillows to Add Color and Splashst

Sew home accent pillows from found fabrics.
This Fabric Square was Quilted and Added to Backing Fabric for a Pillow


Sewing Home Accent Pillows to Add Color and Splash


The new magazines show pillows as accents in nearly every room. The April 2012 Traditional Home has an article entitled "New + Next" subtitled "Patched for Perfection" with fabric ideas and fashionable colors. The April issue of Better Homes & Gardens shows pillows in the indoor-outdoor living area as well as pillow accents as color boosts for the bedroom.


Making a pillow is an easy task for anyone who likes to sew, as you can make the pillow as simple as you want. Let the fabric do the detailing, and purchase a pillow form. You don't even need a zipper. Start with a size that a pillow form will fit -- they usually come in 10 inch, 12 inch or 14 inch squares.


You'll need an extra inch of fabric for the front and 6 inches extra in one length of the back. For a simple fabric pillow in a 10 inch size, cut an 11-inch square for the front and use 1/2 inch seams all around. Cut the back 11 inches long and 16 inches wide. Cut that piece in half on the large side to make it 8 inches by 11 inches. Fold under (wrong side to wrong side of fabric) 1/4 inch and stitch near the edge for each of the center seams. Fold again at 1 inch and stitch close to the previous stitching.


Assemble pillow front to the back with straight pins, right sides together and working with the wrong side of the fabric up. Overlap the two back pieces where you've stitched so they fit the pillow front. The overlap should be about 2 1/2 inches. This overlap will allow you to place the pillow form in the cover and to remove the cover if you need to wash it.


Stitch around all four sides of the pillow edge and turn to the right side. Push the pillow form from the open center in the back into one side. Squeeze the pillow form into the other side.


Shopping thrift stores is a good way to find fabrics and even pillow tops that didn't get finished. I found some pieces that had batting and backing already stitched on a cotton fabric. It needed quilting to hold the batting in place, so I stitched around the design.


I was concerned that the edges weren't stabilized, so I stitched around the pinked edge with embroidery floss, using a lazy daisy stitch that looks like maybe a leaf or flower, or maybe chicken tracks. Here's the result, and it cost 25 cents and a pillow form. Use a complementary fabric for the back -- don't try to match the colors.
Use an embroidery stitch around the edge of the pillow.
Stitched by Hand Around the Edge


Have a wonderful spring season with crafts and decorating projects. The season provides the inspiration and you are the designer.


Linda
cajunC

Friday, February 10, 2012

Quilting With Half Square Triangles Fabric Crafts

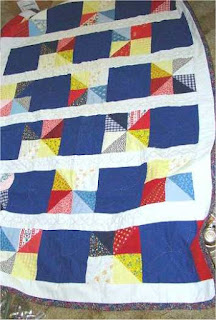
Quilting with half-square triangles fast and easy.
Quilt Made with Half Square Triangles
Fabric Crafts: Quilting with Half Square Triangles

Quilting with squares is a great place to start quilting, but triangles make more interesting designs. Triangles are nearly as easy to work with, and right-angle triangles are half of a square. Some quilting patterns suggest that you cut squares and divide them diagonally for triangles. You have to allow for the middle seam if you use that cutting method. The middle seam takes about 7/8 inch, so if you want 5 inch blocks, you'll need to cut 5 7/8 inch squares to cut diagonally for triangles.

Speed up your piecing. Make two units at a time if you want two-color triangles. Cut the squares, but don't cut them into triangles. Place a light square on a dark square and draw a line for the diagonal.

Stitch parallel to the diagonal on each side at about 1/4 inch distance from the line. Cut on the center line and press the seam toward the dark side. You have completed two units, each with a dark triangle and a light triangle.

Two-color triangle squares are easy to make and have so many possibilities for artistic construction for a pillow or quilt.

Try making quilt blocks with different size squares.
See How Half Square Triangles Work


Here's a little variation. This design has one single triangle for half the square, and four small triangles for the other half. The small triangles are 3 1/4 inch squares cut in half on the diagonal, and the seams are a scant 1/4 inch. Four 5-inch squares make the block you can use for a pillow with sashing all around, or make more blocks for a quilt.

There are four pieces in the pieced half triangle pictured here. You can use the same speedy procedure above to make the small dark and light square. Then add a triangle to each side and stitch the center seam to complete the square.

Look at the design difference just by moving the squares around.

Move the quilting squares around for a different block design.
Change Direction of the Squares

This gives you an idea of how half-square triangles create versatility in the quilting design. They are easy to work with and points that are sometimes difficult to match are not usually an issue with half-square triangle blocks. Maybe this is the inspiration you need to make a new pillow or quilt top.

I made the blue quilt for my daughter when she adopted two babies last year.

See you soon!

Linda

Saturday, January 21, 2012

Practical Sewing For Your Home -- Recycle Crafts Sew Old Towels

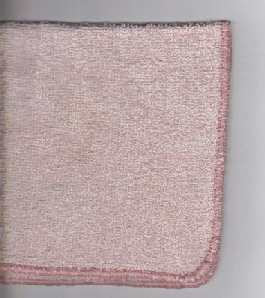
Use old towels to make washcloths when you get new towels.
Old Towels Make New Washcloths if You Sew
Practical Sewing for Your Home

Have you checked the price of bath towels, washcloths and hand towels? With the cost of household items so high, practical sewing will pay for your sewing machine in no time. Practical sewing includes alterations and recycling. Towels get a workout, and January is white sale month in many stores. If you need new towels, don't throw out the old ones. Use them wisely.

Towels often wear on the edges first, and you can only trim the fringe a number of times before the towel isn't quite fixable. That's when you need to make some washcloths or hand towels. Find a washcloth in a size you like to use for a pattern. Lay the towel flat on a cutting area and cut as many washcloths as you can from one towel. Cut squares, then round the corners.

Thread your sewing machine with thread matching the towel. Set the sewing machine for a close zigzag stitch, almost like a satin stitch and about 1/4 inch wide. If your sewing machine doesn't zigzag, fold about 1/4 inch seam allowance. Stitch around a washcloth and see how it works. If you have trouble with stitching around the edge or if the stitches gather the fabric, you can place a piece of white tissue paper under the stitching area. Once you stitch the washcloth, you can wet the paper and remove it.

Stitch around terry fabric with a satin stitch or zigzag.
Use a Satin Stitch or Close Zigzag to Sew Washcloths

If you use hand towels, you can also make hand towels from worn bath towels. Choose a hand towel in a size you like to use as a pattern. Lay the bath towel on a flat surface for cutting and pin the hand towel in place where the bath towel fabric is not worn. Cut about half an inch larger all around the hand towel pattern. Cut as many hand towels and washcloths as you can from the single bath towel. Fold 1/4 inch seam on the long side of the hand towel, and fold 1/4 inch seam again. Stitch each side of the towel with a straight stitch. Do the same for the ends, unless you want to add ribbon, lace or eyelet. If you choose to add a decoration, turn 1/4 inch under and stitch with a running stitch. Pin the decorative edge to the end of the hand towel and stitch again, turning the edge under on each side.

If you need new towels, purchase sale towels to match the washcloths and the hand towels you made. Your bathroom will have a new look and you'll have saved a substantial amount of money with little effort.