 |
| Grandmother's Fan Applique Block |
If you like to quilt, you've probably
tried several different methods and may have made different styles of quilts.
Most piecework involves piecing the same block in different colors of
fabrics, but sometimes that gets boring.
Have you tried to make a sampler
quilt with the same fabrics and different patterns for the blocks? You can make
each block different and keep your interest level high. You can even choose to
applique some blocks and piece others. So long as all of the blocks are the same
size, your quilt will fit together. Repeating some or most of the fabrics will make it look like it's made to go together.
Block by Block by Beth Donaldson is a 1995 publication with 12-inch square blocks that could be
used together to make a single quilt. That's the key to making a sampler quilt
easily. This book doesn't have all the blocks I used, but it has enough to keep you busy and give you ideas for more. I also used Best Loved Quilt Patterns from Oxmoor House (1987) for more designs. Choose 10 1/2 inch, 12 1/2 inch, 14 1/2 inch or 16 1/2 inch squares so
your blocks will line up without having to add individual sashing or additional pieces. We
add the half inch for 1/4 inch seam allowance all around to have a full size
square with an even number of inches when the quilt is completed.
Here's how to get started on this
quilting project:
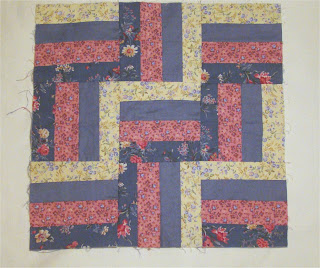
Choose your patterns. Patterns used in this quilt are 14-inch squares and include a six-section fan block, a log cabin block, a nine-patch
with applique leaves, a butterfly applique, card trick pieced block,
grandmother's fan applique on backing, rail fence, churn dash and a couple of
others.
 |
| Log Cabin Block |
Choose the fabrics. You don't need
many different ones. I chose blue and pink with beige for my sampler. You may
want to select fabric for sashing strips between the blocks, too. Wash and press
the fabric.
Cut any full-size squares you need for backing
the applique designs. Remember to add the 1/2 inch for seam allowance. Sometimes
I cut these an inch larger than I need and trim after the applique is done. For
a 14-inch block, I make the backing square 15 1/2 inches, then trim to 14 1/2
after the applique is completed. That allows for any shrinkage from complex
applique stitching.
 |
| Applique Butterfly Block |
Use a rotary cutter for cutting
squares, rectangles and triangles for quilt blocks, but use sharp scissors for
applique pieces. If you're hand appliqueing the design, add 1/4 inch to all
outer edges to fold under. Where the fabrics overlap, don't add to the applique piece that will be on the bottom since it doesn't have to be folded under. The wings of the butterfly where the body is appliqued over them is an example of overlap that doesn't need the 1/4 inch addition.
If you're machine appliqueing the
design, don't add to the template. You can use a fiber bonding fabric like
HeatnBond or Wunder-Under on the applique pieces, but they won't have the
softness of a cotton quilt.
 |
| Nine-Patch with Applique |
If you use freezer paper for hand
applique, cut the freezer paper to the size of the template. Apply
the freezer paper shiny side up (wrong sides together) to the back of the cut
applique piece and turn the 1/4 inch fabric edge with an iron, or you can use
your needle to turn the fabric under as you work around the edge.
 |
| Card Trick Block |
Trim all the blocks to the same size, allowing 1/2 inch for seams. Your blocks should be 14 1/2 inches square at this
point if you're working with 14-inch blocks.
Once you've made individual blocks of
different kinds but with similar or the same fabrics, you're ready to design
your quilt. Sashing between the quilt blocks will make a larger quilt and
require fewer blocks. You can also add a row or two of sashing around the outer
edges to make the quilt larger. Sashing works with square blocks but not for
blocks set on point (like diamonds).
 |
| X-Patch Block |
Before you finalize your sashing
choice, lay the fabric out on a flat surface and place your quilt blocks on it
to see the effect. I used a small beige and brown background print for this one.
 |
| Lay Your Blocks on Sashing Fabric Before Cutting |
If it's not what you want, look through your fabric stash and
try some other fabrics until you get one you want to work with. Wash it if you
haven't already, and cut the sashing in 3 1/2 inch, 4 1/2 inch or 5 1/2 inch
width, as you'll need the 1/2 inch for 1/4 inch seams.
I cut sashing parallel to the selvage
-- it stretches less. If you start at the selvage edge, trim off the bound
selvage edge, then cut your first strip at the cut edge and work across the
doubled fabric. That way, if you have fabric left over, it will be near the fold. The
remaining piece will be folded, giving you a larger surface for your next
project. You may even have enough for backing blocks for more appliques.
P.S. Before I complete this quilt, I'll take the lace off the Grandmother's Fan block. I may add a feather stitch or an embroidery stitch I use for crazy quilting, or even eyelet lace would work. The thin lace will wear out before the other fabrics and is impractical for a usable quilt. Quilting is always a learning experience!
