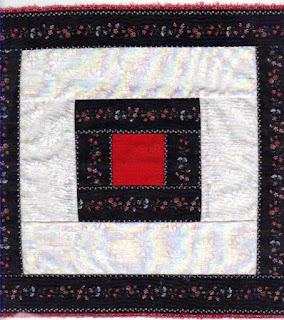
Using Border Prints for Quilts and Pillows
 |
| Use Border Prints for Interesting Quilt Blocks |
Some fabrics have strips of design elements throughout the
fabric and some have the strip at one or both ends. These fabrics make
beautiful skirts, and Daisy Kingdom cornered the market on little girls’ dress
fabrics several years ago. If you have any border prints, consider using them
for quilting or for making pillows.
Check the print by tearing it along the edge of a border
design. You want to see if the printing is straight on the fabric. Surprisingly,
most border prints are accurate. That’s not true for all printed fabrics, and
it’s important for quilting or piecing that the fabric is printed straight with
the fabric threads to avoid visible errors.
 |
| Tear Border Strips to Make Certain They are Printed Straight |
Select contrasting fabrics, and plan a design or find a
pattern you like. You’ll need a design that uses strips of fabric, not circles
or wedges. Log cabin style designs are ideal, and you can make your own design
by starting with a center square in the size you want to work with. I use at
least 2 1/2 inches for center squares, and that makes a 2 inch finished center.
If your border print is 2 1/2 inches, it will look like you did some careful
planning. Make some fabric strips to start -- a light color if your border
print is dark or a dark color if your border print is light. It doesn’t have to
be a solid color -- try small prints or monochromatic designs.
 |
| Start with a Center Square and Add a Square on Each Side |
Add a block on each side of the center block. It will be the
same size as the center. Using one of your long strips of fabric, add a strip
on each side of the three blocks and cut off at the end so it’s even with the
3-block square. Your design will now be a center square with a square around
it. It’s time to try your border print that you’ve cut into a strip. Add that
strip next and cut at the end or let it extend beyond the edge by the size of
the border. In other words, if your border print is 2 1/2 inches wide, leave 2
1/2 inches on one end before you start to sew the strip to the block. You can
make two long sides and two short ones or you can make all four sides the same.
Border prints seem to do better with two short sides and two long ones. Add
another strip beyond the border print if you want large quilt blocks for a
pillow or a quilt.
 | |||||
| Use the Border Print Twice to Make a Large Block |
Needlework: HHGWPD4NM8N4 Technorati