Tuesday, February 12, 2013

Recycled Shoulder Pads Make an Easy 3-D Butterfly

pink and black printed fabric makes 3-D butterfly look 50s style
3-Dimensional Butterfly Requires Little Sewing


From the crafty lady who makes flowers from old zippers, here's another outrageous but fun fabric crafts project, and it costs you nothing.

Shoulder pads are still available in ladies shirts and coats, and most can be removed with a few snips of the scissors. Most women remove them to avoid the linebacker look -- and most toss them in the trash. If you like recycle crafts, this is an easy one for you. You don't even need a sewing machine -- all the stitching can be done by hand.

You'll need two shoulder pads approximately the same size and shape, along with matching thread. You'll also need a sewing needle or a sewing machine. If you want to use the butterfly for your hair, you'll need a clasp or comb of your choice. You can also use the 3-dimensional butterfly for pillows, purses or other crafts projects.

Fold the straight edge of one shoulder pad about an inch down and tack in the center only. The fold should be facing you.

shoulder pad folded down at the top edge to start butterfly design
Start with a single shoulder pad

Accordion fold the second shoulder pad and place it on top of the first one, centered. 
pink shoulder pad shaped like butterfly
Second shoulder pad  requires accordion fold

Stitch the center line to hold the accordion-folds in place.
Two matching shoulder pads folded to form butterfly shape
Lay second shoulder pad on the first one

Center stitched shoulder pads form flat butterfly
Stitch down the center by hand or sewing machine

You can use the butterfly for pillows, quilts or wall hangings in this form, but to make it three-dimensional, you'll need one more step.

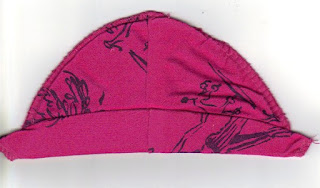
Fold the butterfly in half from the back through the center and stitch from side to side about 1/2 inch through all fabrics, unless you choose to leave it flat.
folded fabric shows half butterfly with back showing
Fold from the back through the center for 3-D

Attach the butterfly to a clasp or comb if you want to wear it for your hair. It fits best vertically.  (This image and the one at the top are made with a camera, while the others were scanned to show the flat work -- explaining the difference in the color.)
3-dimensional butterfly shows 4 padded wings
Completed 3-D Butterfly

You can also attach your completed fabric butterfly it to a linen, straw or fabric handbag, or add lace to the edges to make it larger. You may choose to embellish it with embroidery or beading, especially if you use solid color shoulder pads.

Shiny shoulder pads make the butterfly have an iridescent quality, so don't hesitate to use whatever you have available.

This is our personal crafts idea, and we're delighted to share. We also make angels from shoulder pads that we've featured in a previous article. I'll have to find it for you or write out new instructions for it.

See you next time!

Linda 
cajunC

Friday, January 11, 2013

Felt Applique Pictures and Ornaments -- Easy Fabric Crafts

felt picture sewn on sewing machine without pins
Create Felt Ornaments or Pictures

Create Felt Applique Ornaments or Pictures with the Sewing Machine 

Felt is one of the best fibers to use for applique because it doesn't fray and doesn't require turning under the edges. Felt is also thick enough to create depth for artistry. We don't use fleece for pictures or ornaments because fleece has a layer of foam in the center. It doesn't cut as clean and tends to rough up when sewing.  

Felt Backing Fabric 

Whatever you choose to make, cut a backing piece or use a precut felt square or rectangle for a background. Your felt art is enhanced with a backing piece, and it holds small pieces together. If you're making an ornament for any holiday, start with a piece of felt for the backing. Once you have the ornament designed and completed, cut the backing the shape of the outline or outer edge with about 1/4 inch extended for a "frame." 

Use Our Pattern or Make Your Own 

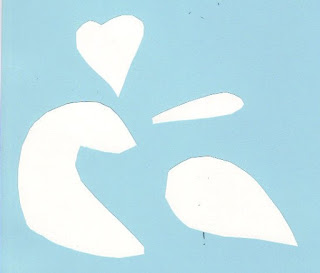
We made a Pennsylvania Deutsch bird. Here are the basic parts if you want to make one similar. You probably know that "Deutsch" is a word for German, and these crafty people were Germans who settled in Pennsylvania. You may have heard it as Pennsylvania Dutch. They created designs with hearts, birds and flowers -- all themes we like for today's crafts.
pattern pieces for felt bird ornament or picture
Basic Pattern for Pa. Dutch Bird Picture

We found a tan backing and started cutting the bird body and pieces to fit the size of the backing (9 x 11 inches) Our bird body is about 3 1/4 inches by 3 1/4 inches (less the tail and crown). Then we cut some wing pieces, tail and crown feathers. 

Design Elements 

Design your work so it's not symmetrical, but is balanced, with something at the "floor" to ground the bird. Otherwise, he might look like he's flying away.  A tulip is common in Pennsylvania Deutsch designs, so we added a flower at the base of our picture. 


How to Make the Design
design picture on the backing to see how it looks
Layout Without Sewing or Pins

Lay the cut pieces on the backing and work with it until you get a design you like. Once you get it the way you want, you can pin the pieces in place or count on your memory to place the pieces where you want them. Because we do freehand work, you can see a difference in the layout and the completed picture.

Use a thread color that will be pleasing with the felt colors. We used red on this one, although the bird is a deep purple. Sew the bird body in place, and then sew the other pieces as you choose. Be creative.

We made the wing in three layers so it would have depth. If you choose to do this, sew the red layer in place first, then add the beige and purple layers, sewing far inside the outside edge so the wing will stand out.   

Completing the Design 

Add enough design elements to keep your picture or ornament from looking sparse. We added some green leaves. Freehand stitch with the sewing machine if you choose. We added some stems and a couple of leaves in green thread and a connector for the crown and tail in red thread. They don't show well in the picture because it's a scan, but they are placed on the backing material only, and done after the basic design was completed. The image at the top shows the bird sewn onto the fabric before adding the freehand stitching. 

Everything in this picture was done with straight-stitching on a basic sewing machine, so you don't have to have anything fancy to make this work. If you have a sewing machine that does fancy stitching, you may want to experiment.

See you soon!

Linda  
All basic elements stitched with red thread by sewing machine
Back of Design Showing Red Stitching
Straight stitch freehand embroidery on backing felt only
Stitching Doesn't Show Because of Thickness

Sunday, November 25, 2012

Make Ribbon Fabric for Christmas Gifts and Decorations

Christmas Crafts You Can Make  -- Instructions for Ribbon Weaving and Fabric

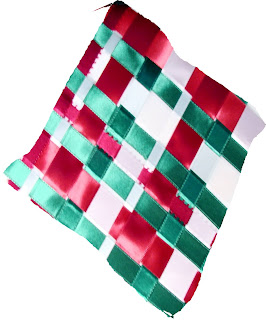
ribbon woven on bonding fiber in diagonal design
Weave the ribbons from center to edges

Thanksgiving is over and it's time to get your Christmas crafts for display or gifts. If you have rolls of inexpensive ribbon you've accumulated from sales, thrift purchases or auctions, you may be surprised that this is the year you can use them for crafts projects. They don't just wrap the gift, they are the gift.

You can make a pillow or tree ornaments or even a purse. Here's how to make the ribbon fabric to make gifts of your choice. 

You'll need: 

Foamcore or smooth cardboard a little larger than the item you want to make.
Heat n Bond or similar bonding material large enough to fit the foam core or cardboard
Ribbon in different colors that will withstand a little heat
Straight pins, iron, ruler and scissors
Matching fabric for pillow back, purse or ornament 

Make a Board to Work On 

Cut the foamcore (like poster paper with foam center) or cardboard to a square size you can use for your project. If you want to make a large item such as a pillow, a 20 by 20 inch square will do, but if you want to make a Christmas ornament, a 10 by 10 inch square is a good size to start. 

Cover the Board 

Cover the board with Heat n Bond, Stitch Witchery or Wunder Under -- any kind of bonding fabric that will attach to the ribbon with heat. A large board will require more than one piece of bonding material. Attach the bonding with clear tape at the back of the board. Make it secure, but don't let it wrinkle. Match two pieces with no overlap, just butting the bonding together. Don't tape on the front -- just on the back. 

Mark Measurements on Sides 

Use a ruler to mark all sides of the covered board at 1-inch intervals. These are your guidelines for your design.  

Select Your Design and Get Started 

Choose how you want to make the design -- you can do a diagonal or a square. Either one will work with the 1-inch marks.

Cut ribbon in lengths at least 2 inches longer than your board.

Start in the middle and place a few ribbons horizontally or diagonally across the board, using the measurements as a guide and securing it with a straight pin on each side. I pushed the pins from the side to the back so they wouldn't be in the way on the front, but work with your board to see what works for you. 

Weave the Ribbon 

Weave a few ribbons vertically or diagonally through the horizontal or diagonal ones, not overlapping and not leaving any gaps. If you're working with a white bonding fabric and white ribbon, watch for spaces at the corners of the crossing ribbon.

Continue weaving over and under until you get a piece of ribbon fabric the size you need to make your item. As small as 12 inches by 12 inches will make a pillow, but you can use smaller pieces of ribbon fabric for Christmas ornaments or the front of a purse for a Christmas gift. 
different sizes and types of ribbon woven on board
Use different sizes of ribbons for interest

Iron the Bonding to the Ribbon 

Once you have the ribbon woven on the bonding fabric and secured, you're ready to make the fabric. Follow the instructions on the bonding material -- it probably recommends a dry iron and medium temperature for 5 to 7 seconds of pressing. Allow the fabric to cool.

Remove the bonding fabric from the board by removing the pins and releasing the tape on the back.

Cut Your Shapes 

Cut the shape you need for your project. I made a diagonal design that would make diamond shapes for tree ornaments, a pillow or purse front. 
diamond shape cut from woven ribbon fabric ready for crafts
Ribbon fabric ready to make a Christmas ornament

Peel the Paper Off 

Peel the paper backing off the bonding fiber so you have a flexible ribbon fabric. Stitch around the shape to keep all the ribbons in place. 

Use the Fabric 

Use the ribbon fabric just as you would any other fabric, but reinforce it with a backing or lining for years of use. To make a diamond ornament like this, cut a backing fabric the size of your diamond. Place right sides together and stitch around the ornament, leaving an opening at the top to turn it and to add a hanger. Turn it right side out and close the opening with hand stitches or with the sewing machine, adding a ribbon loop for hanging.

This doesn't take much time (or thought) and the ribbon fabric is easy to work with once it's made.

Have a great holiday season!

Linda
cajunC

Saturday, October 13, 2012

Sewing Machine Repairs You Can Do DIY

A sewing machine usually has a 25-year warranty on the head, but that doesn't cover everything that can go wrong. A sewing machine is relatively simple (if it's not a new electronic one) and you can probably repair and do the maintenance work yourself. We purchased our Kenmore sewing machine in 1974 for $200 new. It's on its second 25 years now, out of warranty and relying on our ability to keep it operating.

If all that's standing between you and sewing is that your machine doesn't work, it's time to take a look at it. You can troubleshoot your sewing machine and repair almost anything that keeps it from sewing. If your stitches are less than stellar because the sewing machine doesn't cooperate, check the basics:  bobbin, needle, thread and tension.
Here's how to make repairs and keep your sewing machine operating.

Start by unplugging your sewing machine. 

Bobbin
Your bobbin is either horizontal or vertical, and it is located under the feed dogs where the needle goes down. Remove the plate that covers the bobbin, remove the bobbin and clean everything in the bobbin area with a dry toothbrush. You need to remove all lint, fuzz and threads from the bobbin area and under the feed dogs. It doesn't take much lint to mess with the stitching and it's probably the most common problem with most sewing machines. You don't want to pay someone to clean this when you can do it yourself.

If your bobbin is uneven, too full or not filled with similar thread as the top thread, you may have loose threads and skipped stitches. Use a bobbin wound evenly with the same thread as the top. Also, cut the starting thread close so it doesn't hang out of the side hole. Assemble the bobbin by the instructions in your manual. You probably need to pull the thread through a slide that is the bobbin tension and listen for it to click into place. Once you have it right, you'll open the lever on the bobbin cover to insert it into place. This keeps the bobbin from falling out of the cover while you're working.

When you wind a bobbin, you loosen the little wheel on the big wheel. Don't forget to tighten the little wheel again. This common error may make you think your machine is broken. This repair takes the repairman ten seconds and costs you a minimum repair fee. 

Needle
Use the thumb screw to remove the needle. Check to see how it's installed -- the flat side usually faces the thumb screw, but check so you'll get it right. Change to a new needle. If your needle has a burr or is even slightly bent, your sewing machine will notice before you do. Don't trust your eyes on this -- just do it. It might save you repair expense. 

Thread
Use the manual to thread the sewing machine if you're having a problem. It may show you something you're doing wrong, a skipped guide or even threading the needle from the wrong side. The general idea is to place the thread on the spool holder and run the thread from behind to the first guide. You loop down around the tension guide and back up to the guide that moves up and down when you sew. Thread the guides down the side of the machine to the needle and thread the needle. Most of these machines call for threading the needle from the left or from front to back. Once you have a bobbin in the machine and thread from spool holder through the needle, you can turn the machine on to check the tension. 

Tension
If the sewing machine tension isn't correct, you'll have loops on one side of the fabric, skips in the stitches, or a thread that runs on the top or bottom of the fabric that pulls out easily. The sewing machine tension is regulated by a dial on the front of most machines, and experimentation is the best way to determine the correct adjustment.

The bobbin also has a tension adjustment that is a little screw on the cover. If you can't get the tension correct by adjusting the dial on the front, open the sole plate and remove the bobbin in the cover. Use a tiny screwdriver -- you probably got one with the sewing machine -- or a paperclip to loosen the tension. Remember lefty loosey and righty tighty when adjusting the tension screw.

Place a piece of fabric under the needle, close the presser foot and sew a few stitches.  Remove the fabric and check the stitching on each side. Pull on the fabric and see whether the top thread or the bottom thread breaks first. If neither breaks, you've got the tension right. 

General Issues

Oil
If your sewing machine sounds like rocks in a tin can, it probably needs oil. Unplug it and oil with sewing machine oil ONLY using the manual to locate the oil ports. Plug it back in and use some old fabric to test it and remove any oil drips. 

Manual
You no longer have a manual for your sewing machine? You can get all the information you need online. Check the brand website first, then look for helpful sites that have the scanned manuals available. I've never seen one I couldn't locate for free. A recent search for a newer Singer Simple directed me to WalMart and an excellent video for threading this new sewing machine. 

Feed Dogs
The feed dogs move the fabric through the needle path. If the feed dogs are lowered, your sewing machine won't move the fabric. Quilters and crafters lower the feed dogs to freestyle stitch, but if your sewing machine won't move the fabric, you need to check the owner's manual to see where the button or knob is to raise the feed dogs. It's usually on the base of the machine on the right side. 

Presser Foot
You probably have different presser feet attachments with your machine. You need a presser foot that has a horizontal opening if you use a zigzag stitch. A presser foot that has only a small hole works great for straight stitching with a straight needle, but if you change stitches often, it's a great opportunity for you to break a needle. Use a zigzag presser foot and avoid the danger. The tip of a broken needle may get under the feed dogs and waste your sewing time while you try to figure out why your machine won't work.

If you've been through all these procedures, your sewing machine should spin like a top. If it doesn't, review the manual or ask a friend who sews. Take your machine to a repairman as a last resort. We're always into saving money. We have published the Retirement Living Guide Tips and Recipes for Easy Cooking on Smashwords. You can read a large sample for free: http://www.smashwords.com/books/view/125177 

Get ready to make Halloween costumes and Christmas gifts now that the weather is changing and you'll be indoors.

Linda
cajunC 

HHGWPD4NM8N4
WPA73FW9BVAA

Thursday, October 4, 2012

Easy Halloween Costumes for Any Age

Easy Halloween Costumes for Any Age Create Your Own
Costumes don't take much sewing or time and you can make something original with little effort.
Fruits and vegetables are easy costumes to make for children. Choose a fabric the color of the fruit or vegetable you want to represent. You'll need fabric the width of the child from elbow to elbow when elbows are extended. It needs to be twice the length from neckline to knees, or longer if you want to make a cucumber or a zucchini squash.
fruit vegetable halloween costume DIY
Fold Fabric in Half with Fold at the Bottom

Fold the fabric in half, wrong side out and stitch the sides, leaving room for arms starting about 5 inches down from the top. Stitch around the top by folding down 1/2 inch, then 2 inches. Stitch close to the edge and leave about 1 1/2 inches unstitched so you can run a string through the casing you've created. Stitch again about 1 inch from the top to create a ruffle. Run a heavy cord or ribbon through the casing by using a large safety pin or a bodkin to gather at the neckline when you're ready to try the Halloween costume for size.

Cut two holes out of the bottom fold for legs. Stitch around the leg holes and armholes if you want to keep it from fraying. 
Make a "bag" to wear for costume
Sew Sides, Fold Top and Stitch Two Rows for Casing
Turn the costume right side out and try it on your child. Have her step into the sack. Stuff it with newspapers or similar stuffing to create an apple, a tomato, an orange or whatever fruit or vegetable you want. Pull the gathers around the neck and see if you need to make adjustments.

Make a matching hat for your fruit or vegetable costume with a grocery bag large enough to fit on the child's head or a piece of fabric. You can make it square or like a beanie. Add two leaves for an apple, the pointy little "leaves" at the top of the tomato, or a "navel" for the orange. Your child could also be an eggplant or a cucumber with a little skinnying to the costume. Have a great Halloween experience, enjoy the kids and stay safe.  Linda cajunC

 WPA73FW9BVAA


Make a hat to complete the costume
Add a Paper or Fabric Hat for the Costume